


Command & Conquer: Red Alert 2 [PC]
- Jul 16, 2017
- 8 min read
Updated: Mar 2

Historical fiction is a revolutionary literary concept that spans across all forms of human media consumption. On a small scale, an author may set a fictional character in an actual historical time period. On a large scale, entire civilizations may rise or fall at the whim of an author’s imagination. Apply the later example to any major world conflict within the past few hundred years and the result is the same: Unparalleled Dystopia.
For example, consider the political conflict between America and Russia in the later half of the 20th century. In reality, the Cold War’s namesake derives from the fact that a war never actually occurred. Enter Red Alert 2 in which game developers Westwood Studios alternatively starts nuclear war and introduces futuristic methods of weather manipulation, mind control, time travel and, of course, nuclear fallout. Choose a side a determine the methods of mutually assured destruction.
The Challenge?
Complete the Allied and Soviet campaigns on Hard Difficulty in Command & Conquer: Red Alert 2 (PC).
Is this a worthy Challenge?
Let's find out.
Allied Campaign
The Soviet invasion took America off guard, yet the patriots find the courage to defend and strike back. Over the course of twelve missions it is up to the Commander, the player, to save the righteous nation. Antagonizing America has never faired well for past foes and the Soviets shall fall as well.

Throughout the Allied campaign, the player must utilize Tanya; the female embodiment of the equally egotistical Havoc from Westwood’s Renegade installment. Most mission objectives include “Keep Tanya Alive” which becomes more straining as the campaign progresses and gets more Difficult. Tanya is the most powerful unit available but her utilization should be limited because her death will result in a Game Over.
Allied Mission 2: Eagle Dawn is initially Challenging simply because of the lack of available units. At this stage, it is worth noting a few of the difference between Red Alert 2’s Difficulty settings in the campaigns. As seen below, the primary difference is the amount of enemy units:

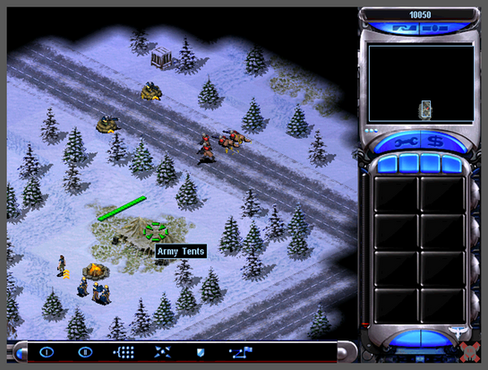


In this example, easy mode includes an initial patrol of only four Soviet conscripts whereas Hard Difficulty includes five conscripts and a Soviet tank. With a triple-promoted Tanya on-hand, any number of infantry would be annihilated, but the tank is a problem because she is not effective against vehicles. With only three GI soldiers available, the player must garrison them inside the nearby tent. Garrisoned structures offer unit protection and increased firepower in which this is the only method to destroy the tank.
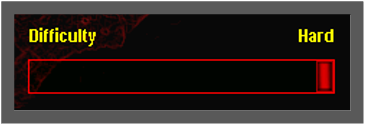
According to the manual for Command & Conquer: Red Alert 2, Difficulty is outlined as the following:
There are three settings ranging from Easy to Hard. Players new to real-time strategy gaming should start with Easy level, while experienced players will find the Hard level quite challenging. (Westwood Pacific p. 5)

Westwood Studios wastes no time introducing Yuri, the bald mind-controller of the Soviet Union. Yuri has secretly installed Psychic Beacons in Washington D.C. and Chicago to control the minds of its citizens. Mission 3 and 4 call upon the noble Commander to destroy them. In Washington D.C., the Soviets have captured the President and now guard monuments such as the Lincoln and Washington memorial.
Monuments such as these play an important role because they offer valuable unit upgrades and resources via crates. Throughout both campaigns, these wooden crates appear when the player performs a unique military action such as destroying or garrisoning a particular building. On Hard Difficulty, these additional war funds are critical.

After a failed Soviet mind-control initiative in Washington D.C., Chicago is nuked instead. America has defeated Yuri’s threat, but nuclear war is officially upon them. Red Alert's historical fiction Allied Leader, President Dugan, rises to the bleak occasion:
I don't give a wooden nickel about your legacy! - President Dugan, Introduction Sequence
Finally, from here, the Allied campaign truly picks up steam on Hard Difficulty. Henceforth, players may experience the following:

On Mission 8: Free Gateway, Yuri has installed another Psychic Beacon and Tanya’s strike team leads the charge. This is the first mission that forces a completion within a time limit and is one of the more interesting recon missions. Accompanied by only three triple-promoted GDIs and two engineers, Tanya must destroy the Psychic Beacon within 20 minutes. Escort the engineers to the resource buildings or face destruction.
After sufficient trial-and-error, Lord Rigor found an Allied War Factory and Ore Refinery in the southwest corner of the map. It is important to note that a captured Ore Refinery does not yield an Ore Miner; one must be built in order to start generating that income. On Hard Difficulty, funds are extremely limited to do so but, with enough awareness, an army can be raised from the smoldering ashes. Quite Challenging, indeed!

At this point in the campaign, unique units are still being introduced, forcing players to keep learning mechanics while also trudging through Hard Difficulty. Mission 10 is an excellent training mission reminiscent of a Skirmish match on the multiplayer map Snow Valley. Lord Rigor believes that Skirmish success derives from multi-base management in order to effectively control map resources. Similarly, in the case of Mission 10, controlling the center of the map whilst consuming the ore in the west and southeast will ensure suitable growth for an Allied armada.
At one point, the Soviets were desperate enough to send a lone engineer towards Lord Rigor's base. The engineer was swiftly struck down by the United States Air Force:

The final Missions of the Allied campaign offer a True Challenge. Lord Rigor presents the last two missions of both the Allied and Soviet campaigns accordingly:
This message goes out to hidden Commander, who continues to dance but ceases to amuse. - Premier Romanov, Mission 11: Fallout
For both missions, numerous appendages of Lord Rigor’s base were bitten off, but the critical limbs were never severed. Hard Difficulty for these missions were indeed Difficult but proper defense balanced with offensive momentum ensured a slow and steady victory.
Lord Rigor paid close attention to the Super Weapon countdowns and simply prepared accordingly. Embrace nuclear fallout and counter-attack with Einstein's Super Weapons. As a final-note to succeed on Mission 12, do not destroy the Kremlin and only eliminate the surrounding Soviet defense. Lord Rigor paid for this mistake.
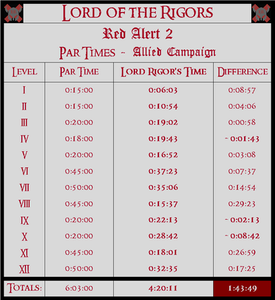
To summarize Red Alert 2's Allied campaign series, Lord Rigor archived mission Par Times below:


Soviet Campaign
In the world of Westwood Studios, America did not win the Cold War, the Soviets did. Led by Russian Premier Romanov and guided by the Russian beauty Lieutenant Zofia, another twelve missions build this climactic turn of world events.

The Soviets are the invaders. In turn, many missions require the player to attack and subsequently defend a particular location in order to continue the invasion. For example, the World Trade Centers in Mission 3 must be captured and defended long enough for Yuri’s Psychic Beacon to activate. Expend all available resources towards the defense and ensure that these historic buildings are garrisoned with conscript units in order to obtain resource crates.
It is interesting to note that Red Alert 2 was released in the year 2000; a year before September 11th, 2001... after 9/11, Mission 3 remained intact but the original Red Alert 2 box art was changed because of such incredibly foreboding imagery:

Compared to Mission 3, Mission 4: Home Front is reversed in which the player must defend and then attack. The base must be defended long enough to amass an army against South Korea’s base to the east. As soon as Lt. Zofia informed Lord Rigor of an opportunity to attack, all mobile units were repurposed to eliminate the Korean enemy.
It is important to allocate resources for both offensive and defensive maneuvers. At times, it is useful to use units from the Barracks or War Factory for defense because, when the time is right, they may be immediately utilized for offense objectives. Selective utilization of mobile units alongside permanent defenses such as Tesla Coils or Prism Towers will yield victory.
Mission 7 is a pure defensive battle in the Ural Mountains of Russia and is indeed Difficult on Hard Difficulty. After about 20 minutes of small ground and air engagements, the Allies send a full force of Rocketeers and Prism Tanks to destroy the Soviet Battle Lab. To effectively defend against Prism Tanks, conscripts and apocalypse tanks were staggered on the outskirts of the base to limit prism range to the base. Lord Rigor’s ambition led him to explore the map whilst defending. As such, oil derricks may be discovered in the east and further money crates may be obtained by destroying Allied vehicles in the southeast and northwest.

Nationalism fills the spirit to continue the war effort. With the leader of the free world captured and their weather machine destroyed, ultimate victory is at hand. Across Missions 1 through 10, Lord Rigor had not experienced a single defeat in the Soviet campaign. This changes on Mission 11 in which Lord Rigor lost six times prior to succeeding. Bear witness to Lord Rigor’s account of Yuri’s eventual defeat in Moscow:
The Motherland demands sacrifice. Much like its factual role in World War II (consider Stalingrad), the Russian empire embodies its ancient and brutal tactic of success through sheer numbers. If a conscript is crushed beneath an Allied tank, a comrade steps forward to take his place. If a conscript’s mind is overturned by a Yuri clone, a comrade swiftly lays the traitor to rest. Speaking of mind-control, dogs or terror drones are ideal assassins because those units can't be converted by Yuri.
On Hard Difficulty, Mission 11: Red Revolution proved to be the most Challenging mission of all Red Alert 2 campaigns. This Difficulty is primarily due to the fact that, during the construction phases of the player's base, Yuri attacks in different stages. For example, as soon as Lord Rigor built His Weapons Factory, Yuri launched a more focused operation of deadlier units including terror drones and apocalypse tanks while muttering:
You don’t really think that War Factory will help you defeat me, do you? - Yuri, Mission 11: Red Revolution
In an ultimate showcase of learning through trial-and-error on Hard Difficulty, Lord Rigor overthrew Yuri with only a Barracks and a War Factory. As planned, Yuri never activated his Iron Curtain because Lord Rigor never built a Battle Lab based on the above mentioned base development. In a painful series of open field sprints, Lord Rigor’s conscript army eventually prevailed within Par Time.
Mission 12: Polar Storm is an enduring example of the war tactics that defines the Soviet campaign: Invade and Destroy. Similar to the final missions of the Allied campaign, death will incur as soon as the player’s offensive forward momentum wanes. For Lord Rigor, the Soviet campaign proved to be more Challenging in this respect than the Allied campaign and was a profoundly rewarding experience.
Lord Rigor's time commitment to the Soviet cause is cataloged below:


Campaign Par Times
Similar to His accounting in Iggy's Reckin' Balls, Lord Rigor has outlined His Par Times for each of the Red Alert 2 campaigns. Note that these Par Times do not represent "speedrun" attempts; on the contrary, these represent Lord Rigor's adaptive survival capabilities.
Unwilling to restart missions when losing, Lord Rigor fought each mission to the bone which resulted in a few unmet Par Times. Past missions weren't revisited in an attempt to earn faster Par Times and the below catalogue represents first successful attempts:


Although Lord Rigor's Par Time difference in the Soviet campaign was much quicker than the Allied times, He still attests that the Soviet campaign is overall more Difficult.
Skirmish Games (Trials)
Trials are open-form objectives with adjustable Difficulty scales or Completion Challenges.
In Red Alert 2, Brutal Difficulty AIs are worth Challenging in the Skirmish Game mode. Those Trials are outlined in the below Uniform Resource Locator:
Conclusion
Is this a worthy Challenge? Yes.
In Command & Conquer Red Alert 2, the outcome of the Allied and Soviet campaigns offers a glimpse into a modern parallel universe. On one hand, nuclear fallout on a large scale. On the other hand, an imaginative calamity including invincible enemies, teleporting tanks and other Westwood wizardry. In either case, the fate of the human world is determined by skilled military leaders.
Wars throughout history were not won easily. However, Red Alert 2 on Hard Difficulty is not inherently Difficult. With enough systematic persistence, even the most Difficult of campaign Levels can be completed within Par Time. Determine the goal through Personal Gratification and save or destroy civilization.

References
No artificial intelligence (“AI”) technologies were used in this writing.
Any use of this publication to train generative AI is expressly prohibited.
Westwood Pacific. Command & Conquer: Red Alert 2. EA Games, 2000.
Scans of game manual & other media: https://www.lordoftherigors.com/library/a2501d88-51ec-4796-93b8-171a3b1387e3


![Arx Fatalis [Original Xbox]](https://static.wixstatic.com/media/2f135b_29d7053950534443826e56b3f5415bcb~mv2.png/v1/fill/w_1335,h_1000,fp_0.50_0.50,q_35,blur_30,enc_avif,quality_auto/2f135b_29d7053950534443826e56b3f5415bcb~mv2.png)
![Arx Fatalis [Original Xbox]](https://static.wixstatic.com/media/2f135b_29d7053950534443826e56b3f5415bcb~mv2.png/v1/fill/w_1260,h_944,fp_0.50_0.50,q_95,enc_avif,quality_auto/2f135b_29d7053950534443826e56b3f5415bcb~mv2.png)
![The Lord of the Rings: Aragorn's Quest [PS2]](https://static.wixstatic.com/media/2f135b_0e09569b009b45e79f89a35c479b2aae~mv2.jpg/v1/fill/w_1331,h_1000,fp_0.50_0.50,q_30,blur_30,enc_avif,quality_auto/2f135b_0e09569b009b45e79f89a35c479b2aae~mv2.jpg)
![The Lord of the Rings: Aragorn's Quest [PS2]](https://static.wixstatic.com/media/2f135b_0e09569b009b45e79f89a35c479b2aae~mv2.jpg/v1/fill/w_1256,h_944,fp_0.50_0.50,q_90,enc_avif,quality_auto/2f135b_0e09569b009b45e79f89a35c479b2aae~mv2.jpg)